Honey Semifreddo with Italian Meringue

https://sweetpaulmags.com/food/honey-semifreddo-with-italian-meringue

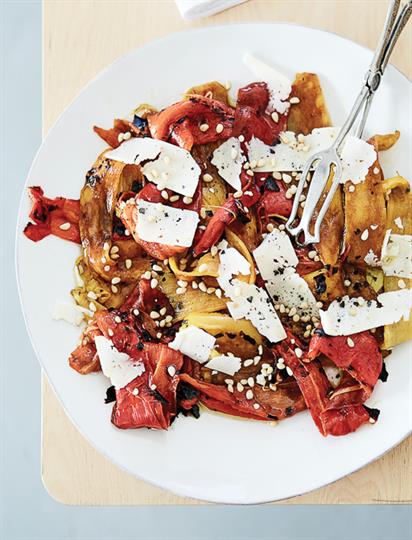
The art of cooking, a gorgeous dessert by Maia du Plessis.


Subscribe to Sweet Paul


Line a loaf tin with plastic wrap, leaving an overlap to fold over the semifreddo.  Over a saucepan of gently simmering water, beat the egg and egg yolks with the honey in a bowl until the mixture is pale and thick.  Whip the cream until thick, and then gently fold in the egg and honey mixture.  Pour into the prepared loaf tin, and cover carefully with plastic wrap before putting it in the freezer for about 2–3 hours.  Place the sugar and water for meringue in a small saucepan over a high heat.  Bring to a boil, stirring continuously with a wooden spoon until the sugar has dissolved.  Reduce the heat to medium and brush down sides of the saucepan with a wet pastry brush to prevent any sugar crystals from forming.  Beat the egg whites with the cream of tartar in the bowl of an electric mixer fitted with a whisk attachment until soft peaks form.  Bring the sugar syrup to 250°F, then increase the mixer's speed to high and, with the motor running, pour in the hot syrup in a smooth, steady stream.  When the syrup is completely incorporated, lower the speed to medium and continue to beat the meringue until it has cooled to room temperature (15–20 minutes). By this stage the meringue will be thick and glossy.  For the toffee and apple topping, heat the sugar in a saucepan and melt until light brown in color.  Place on a silicone mat, dipping mini apples into the mixture to coat them, and add crushed walnuts.  Cut the semifreddo into desired shape and pipe on meringue mixture, using a blowtorch to caramelize the peaks.  Top with cracked toffee and apple topping.                       

EAT Honey Semifreddo with Italian Meringue

Chargrilled Eggplant with Greek Yogurt, Parsley, & Gochujang Butter

https://sweetpaulmags.com/food/chargrilled-eggplant-with-greek-yogurt-parsley-amp-gochujang-butter

Maia du Plessis' cooks up Mediteranean style dishes in an art studio in Cape Town's creative hub.


Subscribe to Sweet Paul


Grill the eggplant in a griddle pan, turning until well marked and tender.  Arrange on a platter and season with salt.  Spoon over the yogurt.  Melt the butter and gochujang together in a small pan until the butter turns nutty brown. Pour the mixture over the yogurt and sprinkle with parsley.                                           

EAT Chargrilled Eggplant with Greek Yogurt, Parsley, & Gochujang Butter

Beef Fillet with Tonnato

https://sweetpaulmags.com/food/beef-fillet-with-tonnato

Maia du Plessis dreams up this Mediterranean inspired meal in a space infused with local artwork. The art of cooking.


Subscribe to Sweet Paul


Rub olive oil into the fillet and season with salt and pepper.  Sear in a very hot griddle pan or on a barbeque.  Cook for a few minutes on each side until medium rare.  Remove from heat and wrap tightly in foil, and leave to rest.  Combine all the ingredients for the sauce in a blender and process until smooth.  Taste and adjust seasoning if needed.  Thinly slice the beef, and place on a platter garnished with arugula.  Spoon over the sauce. Best served at room temperature.                                   

EAT Beef Fillet with Tonnato

Spinach Ricotta Malfatti

https://sweetpaulmags.com/food/spinach-ricotta-malfatti

An artist's studio in Cape Town's creative hub is inspiration for Miai du Plessis' Mediterranean inspired dishes.


Subscribe to Sweet Paul


Cook the spinach in a large, deep pan over a medium heat for 2–3 minutes until wilted.  Drain and squeeze out all the water. Set aside to cool.  In a large bowl, mix together the ricotta cheese and flour.  Stir in the spinach, egg, grated cheese, and seasoning. Stir well until mixed.  On a surface floured with half the semolina, roll the malfatti mix into about 25 balls the size of a teaspoon.  Bring a pan of water to boil, add the malfatti, and simmer for 2–3 minutes— they will float to the surface when cooked.  Drain and keep warm in the pan.  Meanwhile, in a small frying pan, melt the butter and gently cook the sage leaves until crispy and the butter is brown. Squeeze in lemon juice.  Place the malfatti onto plates; pour the sauce over them; and sprinkle with the extra Parmesan cheese.                                 

EAT Spinach Ricotta Malfatti

Chargrilled Peppers with Pine Nuts & Kefalotyri Cheese

https://sweetpaulmags.com/food/chargrilled-peppers-with-pine-nuts-amp-kefalotyri-cheese

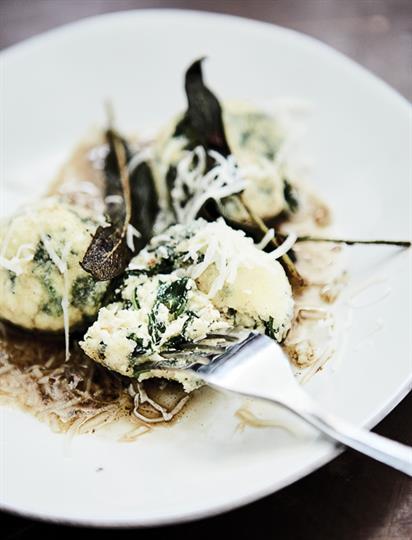
A Maia du Plessis Mediterranean inspired dish.


Subscribe to Sweet Paul


Make a fire, heat up a gas BBQ, or set your oven to grill.  Place peppers directly in the coals if you have a fire going, or grill them whole. Turn the peppers until blackened on all sides and tender.  Place in a plastic bag and close. This steams them in residual heat, making the skins easier to peel and the peppers tender. When the peppers are cool enough to handle, the skins will come off easily in your hands. Scrape out the seeds and pith, and slice them into strips.  Toast the pine nuts in a hot pan; toss; and watch closely that they don't burn.  Place peppers on a platter; grate or thinly slice the cheese; season with sea salt and black pepper. Drizzle with olive oil and sherry vinegar.                                         

EAT Chargrilled Peppers with Pine Nuts & Kefalotyri Cheese

Black Rolls

https://sweetpaulmags.com/food/black-rolls

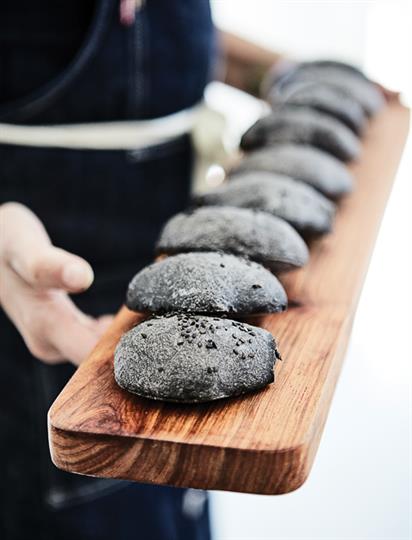
These black rolls - inspired by Morito London—get their distinctive color from fresh squid ink.


Subscribe to Sweet Paul


“Guests are really surprised by them, and they add something fun and unusual to
the meal,” says Maia du Plessis


Put all the ingredients in a mixer with a dough hook.  Combine and knead for 5 minutes.  Then, let the dough rest for 5 minutes.  Knead for 3 minutes.  Cover the dough and leave to rest in the fridge for 1–2 hours.  Preheat oven to 390°F.  Line 2 trays with baking paper.  Pinch off tablespoon-sized pieces of dough and form into rounds.  Leave to rest for a further half hour.  Sprinkle with sesame seeds.  Bake for 10–12 minutes.                             

EAT Black Rolls

"Bloody" Negroni

https://sweetpaulmags.com/food/bloody-negroni

The art of cooking.


Subscribe to Sweet Paul


Combine equal parts of all liquors.  Pour over ice and top with freshly pressed blood orange juice.                                               

EAT "Bloody" Negroni

Mormor's Norwegian Pancakes

https://sweetpaulmags.com/food/mormors-norwegian-pancakes

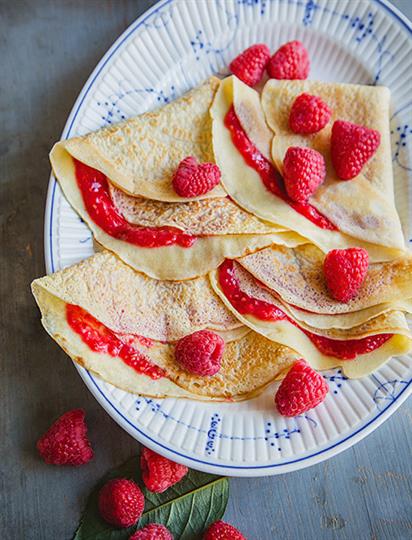
A Norwegian pancake recipe straight from Sweet Paul's grandmother's recipe book!


A story from my childhood in Norway: With a little help from chickens, Mormor always had the sweetest raspberries around. And with a little inspiration from her, I have a light, summery breakfast treat to share with you.

MY MORMOR was an avid gardener. All summer long, she could be found outdoors, knee-deep in soil, and I was her garden helper, weed picker, and coffee-and-cigarette fetcher. On our breaks, she would tell me all about the different ways to garden while she drank coffee and I drank lemonade.

Mormor had a big garden with fruit trees, vegetables, berries, and lots of flowers. I can still remember the juicy taste of sun-warm berries picked right from the stem. There is still nothing like it! I asked her once why her raspberries were so much bigger than the neighbors’ berries. Her secret, she said, was the chicken droppings she used as fertilizer. Chicken poop was not the answer I expected. Oh well! They sure tasted good.

Our tradition, when the first raspberries were ripe, was to pick them for pancakes. We are talking the thin almost crepe-like Norwegian pancakes here. Mormor would stir some berries into a sauce—no sugar needed—and add the rest on top. No sugar in the batter either. You don’t really need it since the filling is always sweet. I must admit, I added a sprinkle of sugar on top of mine. You know how kids are!

Mormor could also flip the pancakes in the air. She tried to teach me, but I gave up after one of my tries ended up hanging from the ceiling lamp. I never did learn how to do it!

Subscribe to Sweet Paul


Place the flour, salt, eggs, milk, and butter in a food processor and blend until you have a smooth batter.  Let the batter rest for 30 minutes. This will allow the flour to “swell” as it absorbs the milk, making the pancakes easier to flip. If the batter feels too thick, add a little more milk.  Preheat the oven to 250°F.  Lightly butter a medium skillet, and heat it over medium heat. Using a little less than ¼ cup of batter for each pancake, pour the batter onto the skillet and swirl to cover the whole pan. Cook for 1 minute. Turn using a spatula and cook for another minute. The pancake should be light brown on each side. Keep warm on a baking sheet in the oven. Repeat with the remaining batter, adding more butter to the pan as needed.  Put each pancake onto a sheet pan and keep stacking them up and storing them in the preheated oven as you make more new ones.  Crush or puree some of your raspberries to use as a filling for the pancakes.  Serve pancakes hot, folded or rolled up, filled, and topped with raspberries.                                     

EAT Mormor's Norwegian Pancakes

Martha Collison's Blackberry & Honeycomb Ombre Cake

https://sweetpaulmags.com/food/martha-collisons-blackberry-amp-honeycomb-ombre-cake

Ombre cakes are so elegant, especially this one from Martha Collison from the Great British Baking Show!  This recipe is from Martha's book "Twist"!


From Martha: "Ombre cakes are so elegant, and much simpler to create than people think. My buttercream gets its pinky hue from blackberry syrup rather than food colouring, so you get their delicate, autumnal flavour in every bite.

The honeycomb should be made and put on top of the cake just before serving, because when it is left out in the air it starts to weep and becomes sticky pools of sugar rather than glorious, bubbly shards. I make this cake in smaller 18cm/7inch tins to add extra height."

Subscribe to Sweet Paul


For the cakes: Preheat the oven to 350°F/180°C/160°C fan/gas 4 then grease three 18cm tins and line with baking parchment.  Make a batch of your favorite Chocolate Cake recipe and divide between the three tins.  Bake for 25–30 minutes until risen and a skewer inserted comes out clean. Leave to cool in the tins for ten minutes before turning out onto a cooling rack.  To make the jam, put the blackberries, sugar and 50ml of water into a small saucepan and simmer for 15 minutes. Stir often, gently crushing the blackberries so they release their colour. Drain the purple syrup into a small heatproof jug using a sieve, and reserve the pulp to fill the cakes.  To make the honeycomb, put the sugar and golden syrup into a medium saucepan. Boil until it turns a dark golden colour, then remove from the heat and quickly whisk in the bicarbonate of soda. The mixture will froth up and is extremely hot, so be careful. Pour out onto a piece of baking parchment and leave to harden before breaking into shards.  To make the buttercream, beat the butter and icing sugar together until smooth and light. This takes around ten minutes with an electric hand-held whisk. Put one third of the icing into a small bowl and add five teaspoons of the blackberry syrup. Repeat with another third in a separate bowl, only using one teaspoon of syrup this time. If the icing splits, add a few tablespoons of icing sugar and it should come back together. Add the milk to the remaining white icing to loosen it slightly. You should now have three different shades of icing that are all the same consistency.  Take the cooled sponges and sandwich them together with a little of the white icing and the pulp leftover from making the syrup. Cover the top and sides of the top layer of the cake with the white icing, applying it thickly as a lot will be scraped off later.  Cover the bottom third of the cake with a thick layer of the darkest icing, then fill in the gap between the two colours with the pale purple. Use a large palette knife, set at a 45° angle to the cake, to scrape off the excess icing and create a smooth finish. The colours should blend together slightly, creating the ombre effect.  Transfer the leftover icing into a piping bag fitted with a closed star nozzle. You can gently mix all the colours together to get a rippled effect. Pipe a wiggly border around the top of the cake, then decorate with honeycomb, blackberries and a few mint leaves, if you like.                                 

EAT Martha Collison's Blackberry & Honeycomb Ombre Cake

Dana Cree's Donut Ice Cream

https://sweetpaulmags.com/food/dara-crees-donut-ice-cream

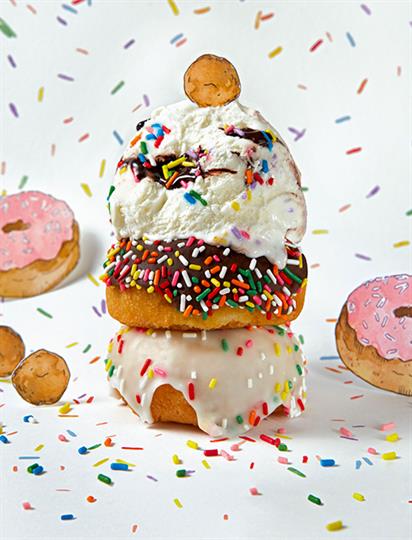
This fabulous ice cream has bits of glazed donut cooked into the base!  The recipe is from Dana Cree's book "Hello, My Name Is Ice Cream".


From Dana Cree: "Baked goods do something peculiar when boiled with milk: they dissolve and become stretchy and elastic. Throw the mixture into a blender, and this strange concoction becomes velvety and thick, like pudding. I first encountered this magic trick at a restaurant full of them, called Alinea. There, a pudding made by boiling brioche and cream was served with raspberries for an elegant “toast-and-jam” bite. Since then, I’ve applied the same principle to just about every other kind of bakery treat I can get my hands on—like gingerbread or devil’s food cake. Most recently, I’ve been reducing glazed donuts to a velvety pudding to flavor ice cream.

Buy the most delicious glazed donut you can find. This might be from a local shop where donuts are hand-forged, or from Krispy Kreme, or even from your grocery store’s bakery case. And don’t stop at donuts; you can use this recipe with any cake, cookie, or pastry you desire."

Subscribe to Sweet Paul


Boil the dairy. Place the cream, milk, sugar (1), and glucose in a medium heavy-bottomed saucepan over medium-high heat and cook, whisking occasionally to discourage the milk from scorching, until it comes to a full rolling boil.  Cook the donut. Add the donut to the dairy, breaking it up with a whisk while you stir it in. Reduce the heat and cook at a low simmer for 2 minutes (4), whisking occasionally to help break up the donut. Blend the base. Remove the pot from heat and carefully transfer the hot base to a blender. Add the vanilla and salt, and start blending on low speed at first, increasing gradually to full speed, to avoid the hot liquid jumping out the top. When the blender is on high, continue blending for 1 to 2 minutes, until very smooth (3).  Chill. Immediately pour the base into a shallow metal or glass bowl. Working quickly, fill a large bowl two-thirds of the way with very icy ice water. Nest the hot bowl into this ice bath, stirring occasionally until it cools down (2).  Strain. When the ice cream base is cool to the touch (50°F or below), strain it through a fine-mesh sieve. (This step is optional, but will help ensure the smoothest ice cream possible.)  Cure. Transfer the ice cream base to the refrigerator to cure for 4 hours, or preferably overnight. (This step is also optional, but the texture will be much improved with it.)  Churn. Place the base into the bowl of an ice cream maker and churn according to the manufacturer’s instructions. The ice cream is ready when it thickens into the texture of soft-serve ice cream and holds its shape, typically 20 to 30 minutes.  Harden. To freeze your ice cream in the American hard-pack style, immediately transfer it to a container with an airtight lid. Press plastic wrap directly on the surface of the ice cream to prevent ice crystals from forming, cover, and store it in your freezer until it hardens completely, between 4 and 12 hours. Or, feel free to enjoy your ice cream immediately; the texture will be similar to soft-serve.                                     

EAT Dana Cree's Donut Ice Cream

Maia du Plessis' Hummus Recipe

https://sweetpaulmags.com/food/maia-du-plessis-hummus-recipe

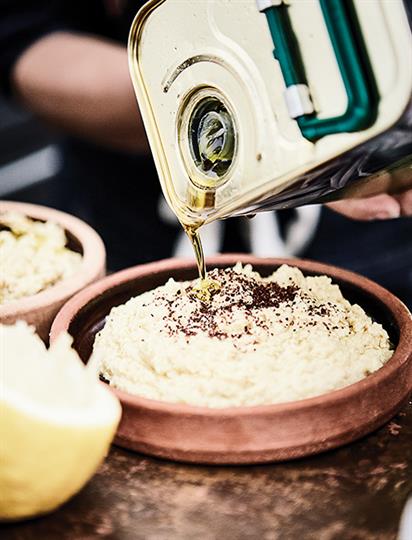
A hummus recipe from Capetown, South Africa!


Subscribe to Sweet Paul


Blend all ingredients together with a hand-held blender, or in a food processor. If it is too thick, add a little ice cold water.  Check seasoning.  Drizzle with olive oil and dukkah to serve.                                             

EAT Maia du Plessis' Hummus Recipe

Tea & Bubbles Cocktail

https://sweetpaulmags.com/food/cava-amp-tea-cocktail

A drizzle of tea flavored simple syrup takes your favorite sparkling wine to new beautiful flavor dimension!


Subscribe to Sweet Paul


Brew two cups of strong tea using your tea bags and boiling water. Allow to steep until the tea is very dark. We used a fruity tea, but you could also go with a classic black tea blend like Earl Grey.  To make the tea syrup, combine equal parts of brewed tea and sugar in a pan, mix until suger is dissolved and simmer until a thick syrup is formed. About 10 minutes.  Allow syrup to cool completely.  To make the cocktail, simply drizzle a small amount of your tea syrup into the bottom of your flute or coupe.  Top with your favorite sparkleing wine.  We garnished with blueberries to compliment the blueberry hibiscus tea.  Cheers!                                     

EAT Tea & Bubbles Cocktail

Golden Beet & Kale Quiche

https://sweetpaulmags.com/food/golden-beet-amp-kale-quiche

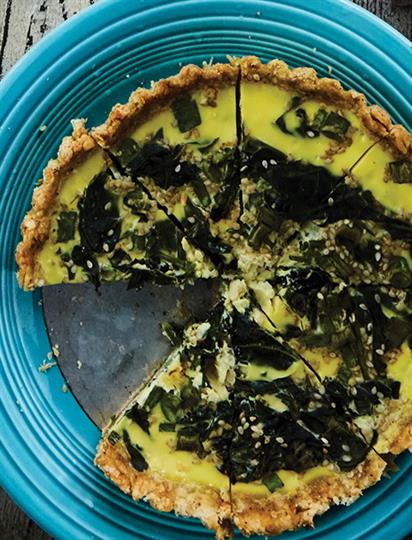
A delightful quiche with beets and gouda and an herbed crust!


Subscribe to Sweet Paul


Preheat oven to 350°F.  To make crust, blend all ingredients together.  Using your hands, push into greased pans evenly, and up the sides. I use the metal tart tins with removable bottoms.  For the base, whisk all ingredients together.  Bake just the crust for about 10 minutes.  Place crust on sheet pan. Arrange beets, pine nuts, cheese, and onions on pre-baked crust.  Pour base over and sprinkle ancho chili powder on top.  Bake for about 20 more minutes until set.                                   

EAT Golden Beet & Kale Quiche

Cardamom Cake with Coffee Drizzle

https://sweetpaulmags.com/food/cardamom-cake-with-coffee-drizzle

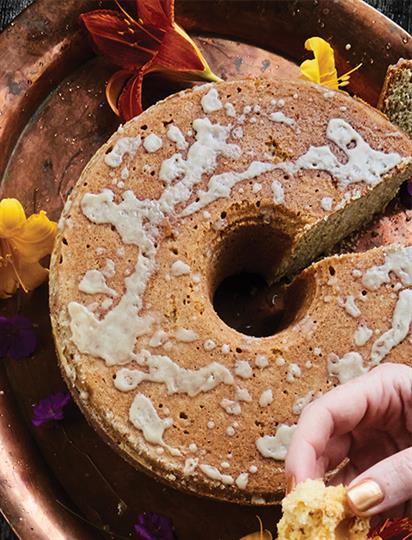
A lovely cardamom flavored spice cake with a sweet drizzle topping!


Subscribe to Sweet Paul


Preheat oven to 350°F.  Using a mixer, cream together the butter and sugar.  Add eggs, milk, and vanilla. Whip together until light and fluffy.  Add flour, baking powder, baking soda, cardamom, and salt, mixing until just combined, being careful to scrape the bottom of bowl.  Put batter into greased and floured bundt pan and bake about 1 hour or until golden and set.  When cake is cool, whisk together powdered sugar and coffee.  Drizzle over cake and enjoy!                                     

EAT Cardamom Cake with Coffee Drizzle

Jammy Gin & Tonic

https://sweetpaulmags.com/food/jammy-gin-amp-tonic

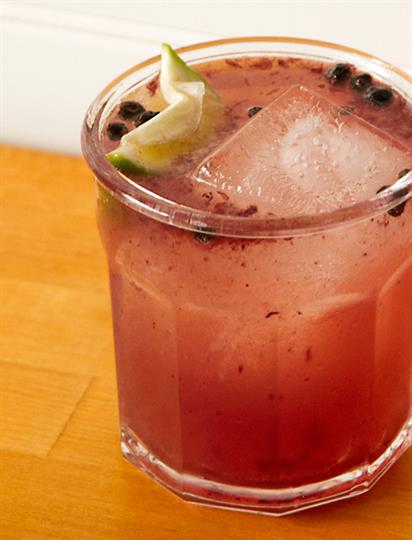
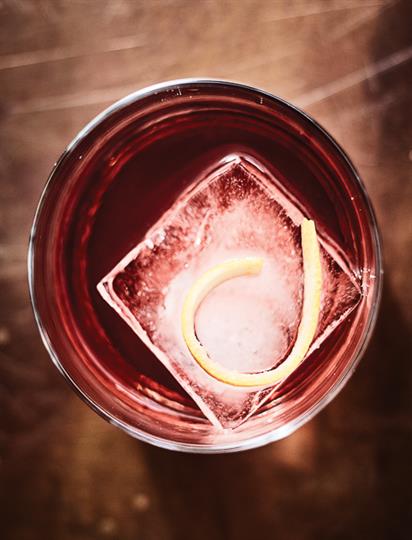
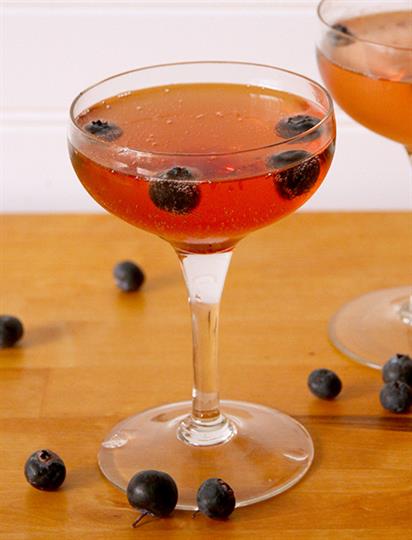
Gin and tonic upgraded with a sweet spoonful of your favorite jam!


Subscribe to Sweet Paul


I love gin & tonic! It's such a wonderful and refreshing treat.  When we recently hosted an event I wanted to make a cocktail that combined gin from our partners at Junipero Gin with jam from our friends at  Bonnie's Jam... and my Jammy Gin & Tonic was born!  It's such a delish drink.. you're going to be drinking it nonstop from now on!


Add ice to a cocktail shaker.  Add one spoon of jam for each G&T; you're going to make.  Add gin to the shaker according to your taste. See my tip section below for a note on the amount. I usually do a 1:3 ratio between the gin and tonic.  Shake shake shake the gin and jam!  Add ice to a glass and pour in your gin and jam mixture.   Top off with tonic.  Add fresh squeezed lime wedge and some juniper berries.  Stir and enjoy!                                   

EAT Jammy Gin & Tonic