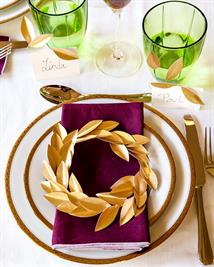
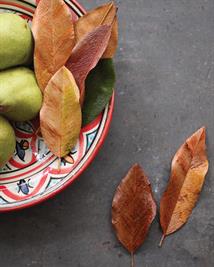
Paper-flower maven and author Tiffanie Turner shares her gift for turning paper into vibrant flowers and foliage that will last all year long. These leaves use a wonderful technique, and it is one of my favorite tricks in my book. Using the dye from one crepe paper to stain another makes for very convincing and natural shades of brown. These shiny, burnished leaves are gorgeous on a table, a mantle, tied to a package, or just tossed in a bowl.
Get the full written instructions at the bottom of this post.
STEP ONE:

STEP TWO:

STEP THREE:

STEP FOUR:

From Tiffanie: "These leaves use a wonderful technique, and it is one of my favorite tricks in my book. Using the dye from one crepe paper to stain another makes for very convincing and natural shades of brown. These shiny, burnished leaves are gorgeous on a table, a mantle, tied to a package, or just tossed in a bowl, and once you learn how to make this leaf, it opens the door for experimenting with many others."
BUY TIFFANIE'S BOOK HERE:

tacky glue
180 gram #567 light brown crepe paper
180 gram #568 dark brown crepe paper
olive green doublette crepe paper
22- or 24-gauge green cloth-covered stem wire
Mod Podge
scissors
small paintbrush
wide paintbrush
wooden skewer
- Create streaks and blotches of reddish-brown stain on 6"-high strips of 180 gram #567 light brown crepe paper by soaking 6" by 6" squares of 180 gram #568 dark brown crepe paper in a cup of water and squeezing the paper dye onto the lighter tan paper as shown. This gives the tan paper hints of deeper brown and sometimes a fully burnished color. Save and dry the soaked brown crepe paper as well, to use for deeper brown magnolia leaves. Prepare the paper 24 hours in advance to allow the stains to set and dry completely. To dry the pools of stain on the paper faster, set on a baking sheet atop parchment paper and set in a 250°F oven for 20 minutes, monitoring closely to be sure the paper doesn't burn.
- When the paper is fully dry, stretch the strips over your knee or the edge of a counter until the crepe in the paper is as smooth as you can make it. Select one leaf template and place atop the paper color of your choice with the small parallel lines on the template aligned with the direction of the crepe paper. If making a tan, burnished leaf, cut two leaf halves from the stained, light brown crepe, two halves from the olive green doublette, and two halves from unstained light brown crepe that has been stretched smooth. If making a darker leaf, cut two leaf halves from the darker crepe and two leaf halves of the same size from unstained light brown paper that has been stretched smooth.
- Using a wide paintbrush, laminate the layers of your leaf halves together with a thin, consistent coat of tacky glue. For the light brown, burnished leaf, sandwich the olive green layer between the stained and unstained tan layers. Trim the edges of the leaf halves as needed to the same size, then add a thin bead of tacky glue along the straight edge of one leaf half, on the stained side. Glue the two leaf halves together, stained sides up, with just a 1⁄16" overlap. Hold the leaf up to a light to check that dimension if desired. To create the wonderful, shiny coat of the magnolia leaf, use a wide paintbrush to apply a light coat of Mod Podge on the stained side of the leaf, keeping the light brown backs matte in appearance. Apply the Mod Podge upward and outward in the direction of the crepe paper grain on both halves of the leaf. Leave the back of the leaf matte and uncoated, unless you want to bring more of the green color through on the light brown leaves, in which case, add Mod Podge to the back of the leaf as well. Set aside to dry briefly while you create the leaf's back rib/stem.
- Wrap 1⁄8" tall strips of outstretched light or dark stained crepe with a light layer of glue around a piece of 22- or 24-gauge cloth-covered stem wire that has been cut 1/2" to 11/2" longer than the leaf itself. Create a point at the tip of the wire, and slightly thicken the portion of the wire that will extend past the length of the leaf and serve as the stem. When the Mod Podge has dried, style the leaf to look natural by first folding up its center line, then creating undulating edges by pulling them back near the top of the leaf, forward near the center, and back again in the lower portion. Curl the edges that were pulled back subtly over a wooden skewer. Glue the wrapped wire up the center of the back of the leaf with tacky glue, holding in place until set, then restyle the edges as needed if they flatten while gluing on the wire. Check the wire a few times as the glue dries to be sure it is adhering properly.
TIP:
Reprinted with permission from The Fine Art of Paper Flowers: A Guide to Making Beautiful and Lifelike Botanicals, by Tiffanie Turner, copyright © 2017, published by Watson-Guptill, an imprint of Penguin Random House LLC. Images copyright.

Made it? Tell us about it–